Orientation Scheduling
Administrators and supervisors can add, view, edit, and delete orientation sessions for qualified claimants. Access to orientation locations may be limited according to the user's office and privileges. Orientations are locked prior to assigning individuals to seats on Saturday mornings.
Navigation
-
From the left-hand navigation menu, click Admin Tasks.
-
Click the ReEmployLink tab.
-
Click the Orientation Scheduling tile.
View/Edit Orientation Session
- All orientations display in a sortable list. Orientations are sorted by Date and Time with the latest orientations appearing first. Click a column name to sort by that column in ascending order; click it again to sort in descending order.
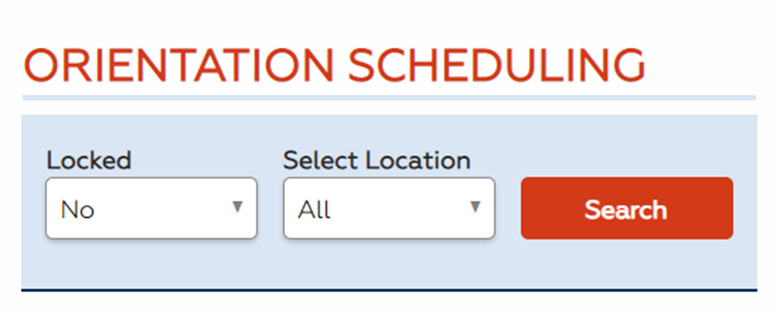
- To search for only locked or unlocked orientations and/or orientations in a specific location, make your selections in the dropdown menus and click Search. The list refreshes based on your selections.
- Identify the orientation session you wish to edit. Click Edit. The Edit an Orientation page displays.

- Modify as needed and click Submit. You may also click Back to discard your changes and return to the Orientation Scheduling page.
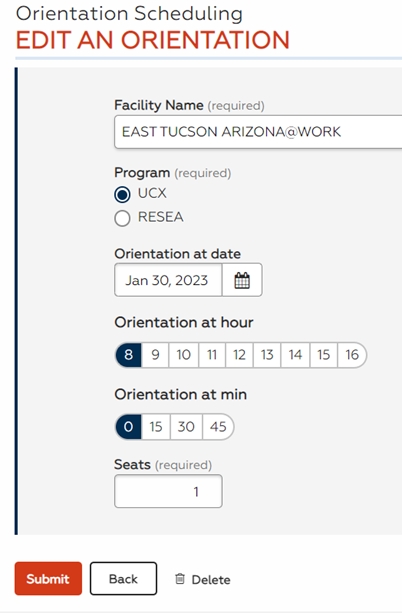
The Save button only appears for unlocked orientations, as only unlocked orientations can be edited.
Delete Orientation Session
- Use the dropdown menus and sortable columns to identify the unlocked orientation session you wish to remove. Click Edit.
- In the Edit an Orientation page, click Delete.
The Delete button only appears for unlocked orientations, as only unlocked orientations can be deleted.
- A confirmation message displays. Click Delete to delete or click Cancel to return to the Edit an Orientation page without deleting.
Add Orientation Session
- Click Create Another Orientation. The Add an Orientation page displays.
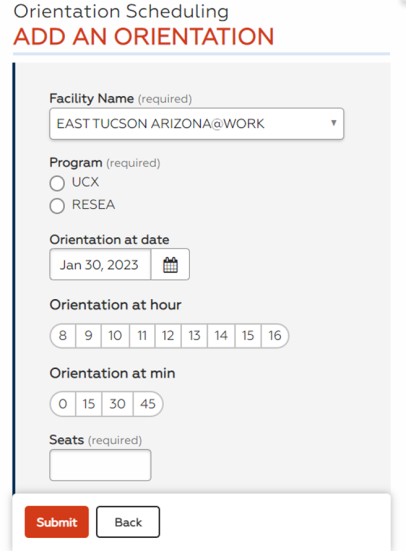
- Fill out the required information for the new orientation session:
- Facility Name: Select the location from the dropdown menu.
- Program: Select UCX or RESEA.
- Orientation at date: The date defaults to the first Monday two weeks from the current date. Click the calendar icon and select a new date if needed.
- Orientation at hour/Orientation at min: Select the start time hour and minute. Hours are displayed using 24-hour time (e.g. select "13" for 1:00 pm).
- Number of Seats: Enter the number of available seats for this session.
- Click Submit. The new orientation session is added. You may also click Back to discard the new orientation and return to the Orientation Scheduling page